| This is being preserved here as the past work of a specific editor, writer, or translator. Due to this, it may contain spoilers and/or be edited differently than the rest of the wiki. |
The Omega System (New, From Nintendo!)
Section Briefing[]
This is it, suckas. The last hurrah. At the end of this dungeon lies the Boss of the game (essentially). This walkthrough seems considerably short compared to the one I wrote for Episode I, but there are a few pages for side-quests and whatnot, which accounts for a VERY large portion of Episode II. I hope you will join me after the credits in completing all of the remaining tasks at hand, as there will be many, most of which you can ONLY do after loading clear data. I am so stoked for the end of Episode II's story, though! It's very nicely done. So lets just do this. "Come on, everyone! We've got a long way to go!" --BlackAlbedo 12:14, November 26, 2011 (UTC)
Omega System[]
Good thing that planet was (mostly) uninhabited, eh?
Set up yo party, fools. Put Jin in Asher and chaos in Dinah, and make their E.S. crafts the battle party. Use their 200 EC Special Attacks to do major damage to foes around these parts. Take the elevator down to the first stop. Stop and go right to find SEGMENT ADDRESS NO. 17. Decode it and find SECRET KEY 28 (Level 4 Class D Skill BEST ALLY.
Go down one more level and destroy the box on the left to find a NANO SPHERE. Go down another level and go right to blow up the box and find a NANO REPAIR Z. You may save on the left if you like. Go down to the bottom floor after that. Get out of your E.S. craft at the small west door down here.
Put Shion, Jin, and Ziggy in your party. We will be fighting Bios and the occasional Mech now, so this is a decent team. If you have difficulty with these 3 against the Ormus Knights, then switch Shion out for KOS-MOS for an opportunity to deal more damage against them. Blow up the boxes in this room to find a MED KIT M, then blow up the north-west boxes to find a hallway.
Up the stairs in the hallway, go all the way east and through the door. Press the button here to unlock the large E.S.-sized doors below. Go back in the other door in the hallway and cross north. Go right past the guard and break the boxes to find a chest with SECRET KEY 24 (Level 4 Class A Skill CURSE). Go west and press the button to unlock another set of E.S.-sized doors. Now return to the E.S. crafts and go north through the unlocked doors.
On the other side of all of these barriers you can disembark the E.S. craft and enter an interesting room. First, you need to go all the way down and out the door, then press the button to activate the A.M.W.S. elevator. Go back up and press the button at the top to start lowering the A.M.W.S. elevator with our E.S. craft on it, then you have to race down and press the 2 buttons to release the barriers as the elevator is about to pass them. Timing is critical. If you're too late you have to restart. If you're too early, they will close again REAL soon and you'll have to restart if the elevator makes contact. You get the idea anyway. Or do I give you too much credit? After you pass the elevator through, go out the door at the bottom again and board your E.S. Before you go ahead though, make some preparations. Put Ziggy in Zebulun, and equip the EMAX300. Jin should be in Asher, and chaos should be in Dinah (still). Put Zeb in the fighting party, with who cares who else. Really. Put either of the other two in that slot. I put Asher in because of its high HP, but Zeb will be the main attacker in this battle. Make sure the other E.S. has the CHARGE RECOVER equipped. Put BEAM SHIELDS on as well if you have 'em. When you are ready, move north. Engage! Make it so!
BOSS: INVERSION[]
DIFFICULTY: EASY
HP: 49,600
WEAKNESS: PHYSICAL / AURA / FIRE
BREAK: NONE
ITEM: AUTO RECOVER
RARE ITEM: NONE
Ooooh, intimidating. Good thing we have this handy-dandy walkthrough to tell us what to do! Have Zeb stock to 300 EC with that EMAX300 equipped. The second E.S. should just stock continuously with the CHARGE RECOVER in order to regain lost HP so that Zeb never has to heal. Zeb will execute METEOR BLAST at 300 EC when either the Ether or Critical Event Slot is showing to do somewhere between 10 to 15,000 damage to Inversion. At this rate, it only takes 4 or 5 METEOR BLAST to disable this Mech... PERMANENTLY. That's it for the strategy. If it overwhelms you, it's because you got it to low HP and didn't use another METEOR BLAST soon enough.
Go north into the next room. Here, you can only destroy these boxes by hitting them on the green side. You can't mess up here, just blow up all of the boxes by hitting them from the right angle. Blow up all of the boxes you can manage to do. You can get 'em all. It's easy. Blow up the small blocks to find a G ETHER PD GUARD, a chest with a CHARGE BOOST, and a NANO SPHERE. Move out of here once you're done scavenging.
In the next room, you'll see a lot of colored blocks, and a door meant for E.S. craft to the west. You may continue to the final area of the game in your fancy E.S. craft, or you may solve the block puzzle to continue on foot to the final area. I prefer to go on foot, but in case you really like E.S. battles, you may go either way. Regardless of decisions, here's the answer to the colored block puzzle:
There are 10 columns.
Column 1: Hit the 4th block up.
Column 5: Hit the 6th block up.
Column 3: Hit the 1st block up.
Column 1: Hit the 1st block up.
Column 3: Hit the 3rd block up.
Column 2: Hit the 3rd block up.
Column 2: Hit the 3rd block up.
Column 6: Hit the 3rd block up.
Column 9: Hit the 2nd block up.
Column 7: Hit the 3rd block up.
Column 10: Hit the 3rd block up.
Column 9: Hit the 3rd block up.
...and now you can cross on foot! Choose your path. On the foot path you will come across yellow crystals lined up along the walls toward the end. Don't just blow them up randomly, unless you want to fight some damn tough fights. The fights you'll find behind the crystals are the Behemoths of Xenosaga Episode II. Ever play Final Fantasy? Behemoths? Yeah... Not the FFX Behemoths. More like the FFVI Behemoths. Here's strategy for both foot and E.S. paths:
FOOT:
Go all of the way to the east and blow up the object to find SKILL UPGRADE B X4. Blow up the purple door to find a block which holds a MED KIT DX. Go in the door just west of this area if you want another item. Blow up the boxes to find a BOOST MAX, then exit, and cross the bridge we made to the west, blowing up the purple door and entering it.
In this hallway, follow it until you reach a junction which goes east or south. Go south, blow up the object, and open the chest to receive SECRET KEY 27 (Level 4 Class C Skill ST DOUBLE). Continue to the east on the main path. Exit into the next area...
Here you will see a lot of yellow crystals. Destroy the middle one on the west wall to find an ETHER PACK DX. Go past one, then two yellow crystals along that same wall and destroy the third to find an ETHER PACK M. Go through the east doors. Here, destroy the middle crystal on the right for a SKILL UPGRADE C. Enter the north door to reach the next to last room...
E.S.:
You just face a buch of Mech fights along this path. Once you clear these dudes out, you never need to worry about them reappearing when you return later, they're gone for good. Follow it to the end to reach the last room...
The Last Room And Beyond[]
Attack the central object, and save at the Save Point on the middle platform. This is the last Save Point of the entire game that matters, btw. After this you'll fight the last Boss(es) of Episode II. The last REAL Boss(es), anyway. The final FINAL Boss fight is just a gimmick meant to progress the storyline, EXACTLY like Sephiroth from FFVII. At least the final FINAL Boss has unique music though, even IF the fight is impossible to lose...
Don't worry about the other exit. That's the way you come in from the E.S. path or the Character path. It allll meets here... This next Boss is complicated. Thank God we only have to fight him this one time, as far as completing GS 32 goes... Start with a party of Shion, Jin, and Ziggy. We will change members into the fight as it moves along since this Boss changes its form a few times, so make sure you prepare everyone for a big fight. Status guarding is smart to equip, and unlocking healing Ethers for multiple people is also wise. When you've prepared your Skills and upgrades as well as you'd like to, step on the block to the north and move on it to reach the next to last Boss...
BOSS: CATHEDRAL[]
DIFFICULTY: HARD
HP: 32,000
ITEM: SKILL UPGRADE E
RARE ITEM: NONE
|WHITE ROBE FORM|
WEAKNESS: BEAM
BREAK: CCCC
|CALL TO ARMS FORM|
WEAKNESS: ETHER / BEAM / AURA / THUNDER / FIRE / ICE
BREAK: BCCB
|CRY OF THE RAPTURE FORM|
WEAKNESS: PHYSICAL / PIERCE / SLASH / STRIKE
BREAK: BBC
That's a lot of fackin' forms, eh?? I can't waste space joking around. This is serious. White is a neutral state in which this Boss just inflicts status effects at the worst. When it turns into Call To Arms, it is strong physically, yet weak in the Ether department. When it is Cry Of The Rapture, it is weak physically, and strong Ether-wise. This changes our strategy with every transformation. This Boss as a whole is immune to being AIRed. You cannot AIR it, so when you've stocked to full, you MUST use Jin first. Have Jin hit the CC zone, then have Ziggy Boosted already to hit the CC zone again, then unload his stock to DOWN the Cathedral. Use everyone else's stock. If the Boss goes Call To Arms on you, switch out Jin for chaos (to utilize Ether attacks). If the Boss goes Cry Of The Rapture on you, switch out Shion for Jr. Btw, Call To Arms dislikes Females, and Cry Of The Rapture dislikes Males, meaning it will Counter-Boost often against the sex it doesn't like. Oh, and if the Boss uses the Mirror Of Truth on anyone, just switch that person out for someone else when the count is around 2 or 1 until the mirror goes dark, then you can switch them back in if you like. If you're lucky like me, you only had to deal with the White Robe Form the ENTIRE fight. I dunno how it happened. I just got incredibly lucky. You can win, using this strategy, and every strategy I've tried to teach you throughout this entire walkthrough. Oh, and it can restore 12,000 HP when it's close to death one time if you don't kill him right then and there. X4 Skill Points is SOOO worth it, though (roughly 6400 Points! I don't remember exactly, but 6K+ for sure).
Head back to the Save Point after this Boss so you NEVER have to beat it again, equip AURA COAT on Jin, Jr., and MOMO along with your favorite Skills, then proceed north to the TRUE final Boss of this game...
BOSS: PATRIARCH[]
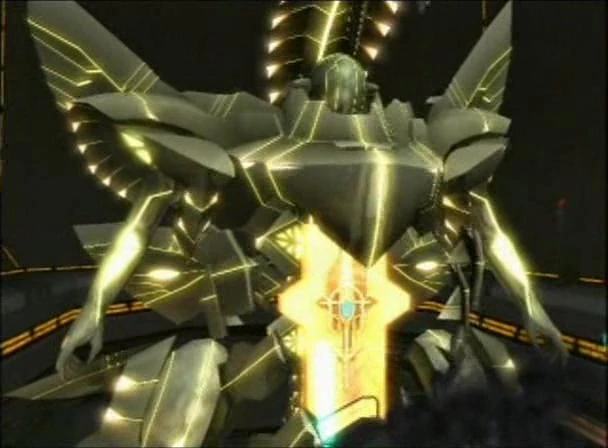
Hope we're not expected to fight THIS thing next...
DIFFICULTY: EASY
HP: 21,600
WEAKNESS: PHYSICAL / PIERCE / SLASH / STRIKE
BREAK: BCBB
ITEM: SKILL UPGRADE E
RARE ITEM: AWAKENING IV
First off, this guy has 2 lives, just so you're not confused when he gets back up. You'll get a fake experience screen after the first fight as kind of a sick joke on the developer's part. This is the first life. Take Jin, MOMO, and Jr. into this fight. They are the best choices for both fights vs. The Patriarch. This Boss is actually EASY if you stick to a STRICT strategy and strike quickly. First, steal AWAKENING IV from him. It is super important that you do this, even though we are neigh unto the end of the game. That is, if you plan on succeeding in the after-game events. Just keep doing the stock / unload strategy you've been doing the whole damn game to hurt him bad. If you feel up to it (If Jin is at a level in which he has high HP or you won't mind reviving him if he should die), you may move Jin behind the Patriarch to make your assaults more effective. Be warned, that while this is a great move to increase your damage output, the one character you move behind will now have their back turned to Omega, and turning your back to Omega is NOT a wise thing to do. It's your call, Omega doesn't attack THAT much, and not until the end of the Patriarch's HP. Use Jr. to start the assault with a BC zone attack, then Boost Jin and do a BB zone attack followed by all of his ![]() stock to AIR the grandpa, then Boost the rest out, you know how we do. His attacks can be damn annoying sometimes, with the occasional face-stomping Boost chain, but AURA COAT will help a lot, and if you can't get past the first fight, you're likely not setting up your assaults as effectively as you can. Focus on taking him down ASAP, without worrying about Skill Multipliers at all. It's the second form you want to worry about when it comes to Multipliers....
stock to AIR the grandpa, then Boost the rest out, you know how we do. His attacks can be damn annoying sometimes, with the occasional face-stomping Boost chain, but AURA COAT will help a lot, and if you can't get past the first fight, you're likely not setting up your assaults as effectively as you can. Focus on taking him down ASAP, without worrying about Skill Multipliers at all. It's the second form you want to worry about when it comes to Multipliers....
PATRIARCH ROUND II
DIFFICULTY: HAAAAAAAAAAAAAAAAAAAAAAAAAAAAARD!!!
HP: 32,400
WEAKNESS: SAME
BREAK: BCC
ITEM: (If you haven't stolen yet) SAME
RARE ITEM: (If you haven't stolen yet) SAME
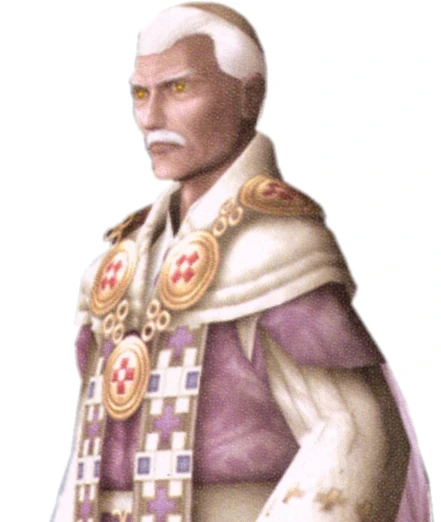

Bless you my child.
This is essentially the same battle, just the Boss has more HP now and is slightly more vengeful... and the Break has changed. Stock up, have MOMO or Jr. make the first B-zone attack while Boosting Jin, then hit CC and AIR Patriarch again, just like last time. Casting ATTACKER helps make your assaults more effective, but also lowers your defense. It does wear off after only a couple turns though.It's not required to win. Just keep up on the stocking and assaulting pattern, and don't let your HP drop too low. If it's one thing I know about Episode II, it's that enemies and particularly Bosses can sense when your party is weak, and will pinch you out of existence like a turd if you leave said weakness unchecked. This time, DO worry about the Point Multipliers, as you will likely load your clear data to continue with the side-quests, and you'll get a LOT of Points from this...
...........just......wow. All of the Testaments in one place. Ziggy seems to have some beef with Testament Black. It finally ties in! The final scenes of Xenosaga Episode II from here on out are some of my favorite in the entire series. I can barely play Episode I anymore because the characters are so undeveloped in the beginning. Episode II turns them all into drama powerhouses.
After all of that, take Rubedo to the Park on The Durandal. This will kick off the scenes that will lead us to the final fight with Albedo in the Space-Time Anomaly. When you arrive at the Anomaly, you may equip whatever Skills you please, as you can't die from here on out. Save the game, as sometimes it may take a little while to put Albedo down for good. Proceed north. And north. And north. And north. Meh, you get it.
FINAL BOSS: ALBEDO[]


You bore Lord Albedo with your guns and your HP and your red hair...
DIFFICULTY: CAN'T LOSE
HP: 5300
WEAKNESS: PHYSICAL / AURA
BREAK: CHANGES
ITEM: NONE
RARE ITEM: NONE
Since you can't lose, feel free to play around during this fight. It can be confusing, especially when he keeps restoring his HP every time he hits 0. When I first did this years ago, I just thought I was doing something wrong. Nope. You just have to get lucky. Every time Albedo's HP hits 0 he has a chance of either casting Regain Consciousness or Eternal Chain. Regain Consciousness will give him more HP and the fight will go on and on. If you see Eternal Chain pop up, then congratulations, you've just beat Xenosaga Episode II!! Albedo's Break is always changing, so just keep checking it. A good strategy for taking lots of HP off at once is to attack his Break until you gain enough bonus Stock to launch an assault, then apply AURA SWORD and / or ATTACKER, hit his Break again, and unload the rest of your Stock. You can't lose, so ATTACKER is perfect for this battle. Actually, you can lose. I've been in this battle for so long before that I just turned my PS2 off. That's how you lose this battle lol...
I hope you've all enjoyed Episode II as much as I have! It's great, isn't it? I realize I have a sort of sick obsession with this game that makes it hard for me to imagine other people enjoying it as much as I do, but still, you had fun, didn't you? Here comes the part where I typically promote the next Episode. In this case, that's Episode III. I've said it before and I stand by it, that every Episode in this series is better than the last. The battles in Episode III are a bit of an adjustment, but once you get the hang of the flow of fighting, it gets pretty fun. Yes, this is the end of Episode II's story, but not the end of the walkthrough!! There's SO much more to do after the credits! If you're down, follow me to the next page and lets complete some stuff!