| This article pertains to Xenogears: the sub-database of Xenosaga Wiki. |
| This is being preserved here as the past work of a specific editor, writer, or translator. Due to this, it may contain spoilers and/or be edited differently than the rest of the wiki. |
The Trials Of Aveh (Does Anyone Aveh Light?)
Section Briefing[]
That was a pretty good start to the game. It's already much better than I remember it. We haven't REALLY had a chance to stretch our legs yet, but soon enough hopefully. Up ahead we have the story of a King who has lost his Kingdom, a Capitol which has been occupied by an enemy. Aveh needs OUR help to re-establish the former monarchal powers! Will we do it? Sure, if only to find out what ELSE happens in this game.
Stalactite Cave[]
Here we are in this cave, then. Heads up, you will periodically battle a certain type of robot called a Nomad Fix Bot. They will generously restore fuel and HP to your Gears. You must run or defeat them when you desire to move on. To the S of the save point there is a plot device. Press ![]() to use this device and open a way to the next area. Before you leave this new chamber to the S, grab the GOLD NUGGET, worth some thousands of G from any buyer. Exit S.
to use this device and open a way to the next area. Before you leave this new chamber to the S, grab the GOLD NUGGET, worth some thousands of G from any buyer. Exit S.
Here just go to the end of the tunnel into the next cavern. In the cavern head SW across the precariously thin bridge until you see a gyrating robot. It has some weird info on some weird stuff. It's more weird that it's maintained. Make a brief detour W to jump up some ledges to a chest with an IRON GWHIP. Equip it on Brigandier. Note that red-lighted sand sensor nearby.
Go back and exit S of the robot. Head toward the house (!) down here to speak with Isaac Balthasar. He'll be most helpful. Note that humans may have only arrived on the planet 10,000 years ago or so...! Put THAT piece in your puzzle and look at it. After being informed about the sand sensors you may buy some Gear upgrades and standard items. I highly recommend you buy all of the best upgrades for your Gears, even if you need to farm G for a few minutes. That means upgrade both Gears' frames, engines, AND armor, and don't forget to refuel. Get used to this process as the game progresses. You're hurting yourself in a surprisingly significant way if you don't keep up on Gear maintenance. You'd be amazed how often 500 HP will make your life a whole lot easier, so always save G (eventually TENS OF THOUSANDS of it) for Gear maintenance. Also get as many OMEGASOLS as you can. You can only use them on the field, but they're the equivalent of an Elixer from Final Fantasy - full heal HP/EP. And they're cheap. Save outside the hut and let's get outta this hole.
We need to activate sand sensors. The way we want to go is out the NE corner of this area. Cross the bridge and pass through the tunnel. Keep an eye on the compass when you pass through the tunnel. After a random battle it can be easy to forget which way you were headed, and it's a long tunnel. On the other side, cross the bridge to the first sensor and deactivate it. Jump down and take our old path back to the gyrating robot. When you reach him again, be polite and say "Hello", then take a right turn to the ledges where the last sensor is. Climb up and deactivate it. Now return to Bal to conclude our business in this bile duct. He'll open the gate.
After the scene (calm down you Christians) your Gears will be restored and you may save and be on your merry way. If you need to buy items still, you can do that. Leave out the gate to the W. On the other side, use the gondola to cross the chasm. Activate the main power and cross back over to your Gears. Equip your Gears with the best armor and such that you have, there's a big'un coming up. Ride the lift down, cross the S pit, and save before moving on.
BOSS: CALAMITY[]
DIFFICULTY: EASY
HP: 2500
ITEM: NONE
This is a difficult-easy battle. If you stick to the strategy, Calamity shouldn't be able to touch you for the most part. That doesn't mean it won't use its trump move that never misses - shooting red missiles at you - like a thousand times. It just depends on the day. Anyway, just have Bart use WILD SMILE until he runs out of EP while Fei uses level 1 Deathblows repeatedly (yes, even if you have the level 2 ![]() button Deathblows, it's more efficient this way). When Bart runs out of EP or you get sick of using WILD SMILE you can let him join the battle, also using level 1 Deathblows. You probably still won't need Booster at all. Calamity should be at peace soon.
button Deathblows, it's more efficient this way). When Bart runs out of EP or you get sick of using WILD SMILE you can let him join the battle, also using level 1 Deathblows. You probably still won't need Booster at all. Calamity should be at peace soon.
After THAT nonsense, find the E side of the room and go S and climb up to the road. Exit S to a change of scenery!
Viva La Resistance![]
Now we join the resistance! Get ready to take lives to restore Aveh to its former glory! We fight in the name of her people! Where's a molotov cocktail?!
On board the Yggrasil there's some interesting things you can do. Approaching your Gears on the upper walkway will put you in a scene with 2 NPC mechanics you can talk to. If you talk to the one on the left side you can change the names of your Gears. When you're done playing around, look for the bridge. It's at the end of the hallway across from the Gear hangar, up the elevator. At the top, you'll be in a small room with a ladder and a door that has a gold ship steering wheel design on it. Go in there and speak with Sigurd to get us to our next area. For a bit of fun, maybe speak with Flip- I mean Franz, the resident dolphin. He sits down at a control panel and will play his personal collection of recorded sounds to you at random. Kindaaaaaa lame. Just find Sigurd.
This base is quite expansive. Explore all you want. After tea time with Mason, meet the others in the NE room in the elevator area to discuss artifacts. Fei is breaking from the stress. He storms out of the room in a drama strut looking highly flustered. Onward, to adventure! You may actually go outside of the base and level Fei up if you wish, but it's kind of a waste of time to level only one character. Find Bart by going in his room and attempting to leave. Open the chest before you really leave to get an IRON WHIP. This scene will bring the elevator back up. Take it down to Yggdrasil and talk to Bart by the roof hatch. Then follow the walkway to another elevator which you should take down. Speak with the mechanic down here. After the scene, take the elevator back up and prepare Weltall for battle. Save in the N bunk bed room, then talk to the dude to go to sleep.
That was a LOT of stuff to do. When chaos has engulfed the rebels, ride the elevator down to the Gear hangar once again. We will find ourselves in a battle with a Swordknight. Mmmk. Not really a boss. Just use ![]() or
or ![]() button attacks with Brigandier, in addition to level 1 Deathblows. Go all-out with the pawn-bots we have helping out. Run 'em into the ground.
button attacks with Brigandier, in addition to level 1 Deathblows. Go all-out with the pawn-bots we have helping out. Run 'em into the ground.
As for Broyer and the Aegisknight... Another not-so-boss scenario. He's got 700 HP, so keep with the ol' faithful ![]() /level 1 Deathblow pattern OR the level 2 Deathblow pattern if you have it.
/level 1 Deathblow pattern OR the level 2 Deathblow pattern if you have it.
Wandknights. Peculiar. Anyway, have Heimdal dismiss one while Brigandier dismisses the other. Keep those Deathblows rollin'!
Clawknight! See: Broyer's strategy (above).
I knew this moment would come...
BOSS: SCHPARIEL[]
DIFFICULTY: EASY
HP: 4649
ITEM: BEAM COAT
They sneaked a real boss in on us. No matter. It's super easy. Brigandier must use WILD SMILE a few times or here and there. However you want to do it. The other 2 will be unleashing hell on it in the meantime. Deathblows and more Deathblows. No real need to Booster yet, though it would speed things up I guess. Weltall and Heimdal will tear through this can pretty quick.
After the fight, I'd recommend you upgrade Heimdal at the local Gear parts stores. The base shop has a frame for Heimdal while the Yggdrasil shop has engines and armor you all need. Hit the base shop (W at the top floor) then the Yggdrasil (S in the hallway near the bridge will take you to the Gear hangar/shop). We'll be leaving when we're ready. Speak with Sigurd on the bridge to set out for destiny!
Invading Home (Operation Aveh: Part 1)[]
For the story, we want to head to Bledavik, capitol of Aveh and long lost home of Young Master "Prince" Bartholomew Fatima, but if you're like me you saw those Gear parts while you were shopping and said "I can't afford it now, but I'll be back..." and you already have plans for diversions. Now is a good time to divert. Most of this area of the map is available now, and there is some rare stuff to buy in a town called Nisan, NW on this continent. Look for the single tree named "Road to Nisan", then use the Yggdrasil to dive under the ground and move to Nisan. Don't get confused. The Yggdrasil will be waiting for you at the end a side path near Nisan's main entrance/exit that has a hard to see green map marker on it. The only way to re-board it is to get on Nisan's town mini-map and press ![]() when you're on that side path.
when you're on that side path.
Now that you know how to GET to Nisan, here's what I'm doing. I'm going to save up a bunch of cash and get some good items. Here's why. Later on in the game, you will no longer be able to purchase (or they're really difficult to find I can't remember) such things as MAGNETIC COATs (increase Gear Response stat by an obscene +25, 4,000 G) and ETHER DOUBLERs (uses 2X EP to do 2X effect, 38,000 G). Both are pieces of equipment which are highly valuable because of availability for one, and because of their huge bonuses. They are very expensive to stock up on however, so if you don't want to get these you certainly don't have to. You will still have some time in the story to rack up a surplus of funds if you wish to attempt purchasing them later. The best way I know to get cash right now is just to fight in your Gears on the overworld :\ Spear Troopers (Gears with spears ;D) drop 1,000 G each, and you will amass lots of EXTRA ARMOR and EXTRA ARMOR +1s from nearly all enemies to sell at the shop. Search the desert for the Spear Troopers. Simply board the Yggdrasil by pressing ![]() when you are steering it to instantly restore all Gears' fuel to full, free of charge. More power to you if you can resist the urge to torture yourself by collecting rare equipment. More power to you (literally) if you do fight a whole bunch to get G, as you will level up a lot. Moving on...
when you are steering it to instantly restore all Gears' fuel to full, free of charge. More power to you if you can resist the urge to torture yourself by collecting rare equipment. More power to you (literally) if you do fight a whole bunch to get G, as you will level up a lot. Moving on...

See the Cherenkov? See the Margulis? Depending on your stance of the Xeno-Paradox, he's either the combination of the 2 or he was split into those 2.
In order to infiltrate the Capitol, you will need to be at the Capitol. Make haste to Bledavik! It's that mound in the middle of the desert (not the cave thing, but near that). Upon entering and moving forward we will witness a pretty interesting cutscene. I guess Grahf has Margulis qualities, but Kahran Ramsus is the exact embodiment of Margulis / Andrew Cherenkov, down to the first scene for Ramsus / Margulis being the interrogation of a little girl, and the appearance of Cherenkov. There's more to it, but let it be known that Ramsus was likely the inspiration for those two 'Saga characters. After the scene we will be in the marketplace!
An eccentric gentleman will approach the party by the entrance and ask if we have hotel arrangements yet. If you say no, he will refer you to a nice local hotel. If you say yes, he will proceed to insult your choice and make a comment about how you must be poor, then he will refer you to the hotel of his preference (same one he refers if you say no). Thanks eccentric gentleman. We should probably take a look at the hotel :\ Blue door building on the upper level, SW corner of town. AFTER EDIT: You might really be interested in doing the H&S mini-game right now, as very lengthy repeated dialogue is unavoidable if you do it at the point I originally wrote it in this walkthrough. See 3 paragraphs ahead for more details.


At least in Xenogears they don't let the jump-roping mommy's girl join the battle party... but Chu-Chu on the other hand.....
In here a Nisanian female will introduce herself. She invites all three of us stags to her room upstairs (it's got a balcony, with all of those white, flowing curtains). As soon as you enter the room, the tempting aroma of lilac and cherries engulfs your attention. The scene is so perfect that you don't even notice that she hasn't removed her pope hat or dress. When you finally begin to realize what the rest of your senses are experiencing, she seriously asks "Who are these people?". She then proceeds to talk business about Aveh, specifically MOMO errrrr-Marguerite. Talk about misleading. We're only coming back here if we have to.
Ah... Planning a break-in has never been easier than with a walkthrough, eh? On the E side of town, upper level, there's a grate. Mash ![]() around it until the thing sitting on the bench nearby takes pity on your fruitless attempts at investigation and decides to inform you that you need a key to get in. Thank you, sir/ma'am. Ughhhh. It's not immediately obvious, but we have to go back to the sl- ...nun now and report about the amazing grate. After laying the first stage of the plan with the conspiring nun, our next destination is technically Shakhan Square, the next marker on the Bledavik map, but first, I'ma goanna tell you 'ow to git sum swag.
around it until the thing sitting on the bench nearby takes pity on your fruitless attempts at investigation and decides to inform you that you need a key to get in. Thank you, sir/ma'am. Ughhhh. It's not immediately obvious, but we have to go back to the sl- ...nun now and report about the amazing grate. After laying the first stage of the plan with the conspiring nun, our next destination is technically Shakhan Square, the next marker on the Bledavik map, but first, I'ma goanna tell you 'ow to git sum swag.
There is the second of three badges to get here in Bledavik. It's called the H&S BADGE (hide and seek). You gotta play hide and seek with this kid. Coincidentally, he will advance the main story by telling us about the key to the well after we speak with him. Let's find this awesome kid! Unfortunately, if you skipped my previous warning and waited until now to be doing this, you will get the same super-long dialogue about the well story every time you interact with this fool. I don't know if doing this earlier helps, but I thought I'd try to warn you just in case. Anyway, on the W side of the ground level marketplace, look for the alley/hall with the torn canvass above it, then go all the way through the alley/hall. In the dead-end there should be a small kid in one of the corners. That's him. Agree to play, enter the nearby door, then return to find that he has hidden somewhere. Where? Well, wouldn't you like to know.
HAHAHA, just kidding. His first spot is behind the N archway just before leaving the zone. Don't make the mistake of talking to him again if you are getting the well dialogue. Just leave the area via any exit or door and return. He is now hiding behind 2 barrels by the Ethos establishment in the SW corner of the area (remember, the Ethos are denoted by the Dodge Ram cross symbol and usually have the nicest joint in town). Check out the shop (not a single thing you need probably) then exit. The kid is now very hard to see, but on the W side of town, upper level, there is an archway adorned with dabs of blue. You can see him if you swing the camera past the front of the archway. Go in the nearby door and lets do this one last time. The last place the kid hides is by the S entrance, behind the E wall in a corner. Now you get the badge and no more well stories!!
Trust me on this one. I know it sounds crazy, but when have I steered you wrong, WHEN?! Talk to a lady merchant straight across from the guy who buys monster parts (Let's refer to him as Dr. Frankenstein from now on. We won't be referring to him from now on though methinks, so laugh now). She will get robbed by a kid! Follow the kids up through the hall and speak with the one in the back. Agree to help him and... give him 1,000 G. This will lead to them opening a convenience shop later on when we need it. Speak to the thing on the bench we saw earlier on the upper W side of town to get the WELL KEY. There's more to do before you can go sewer spelunking though.
You may now proceed to Shakhan Square. This is basically a G pit. There is nothing major to do here, nothing that will have any effect later in the game. You are free to have fun here, if you want to pay. You can get drunk, breath fire, buy a kid a toy (or yourself a couple if you like), get a balloon, and get your fortune told, but that hack isn't telling you anything you don't already know. Not for me anyway. Up the hill in Bledavik you will find a tournament registration area. We will need to enroll Fei in the brawl, so pick a counter to register at. You'll get to chose your name a la "The Elder Scrolls IV: Oblivion" Arena Grand Champion style. After you make a funny or serious combo for a name (or vague?), gtfo of Dodge.
Return to the nun (you have to actually go through Shakhan Square again, lame) and update her about the plan. Save in the hotel lobby. We're going for a bit of a stretch here! Talk to either of your belabored party members to commence resting procedures.
Invading Home (Operation Aveh: Part 2)[]
Take Fei over to the tournament! You can speak to our ol' pal Joe in one of the tents, but to move forward with the plot, speak with Distinguished Young Mister Dan in his tent. I want to shake the hand of the guard who let this child into the adult fighting tournament. That guard's got balls. Fighting Distinguished Young Mister Dan is going to be an experience I'll cherish for a looooong time.
After that, we'll return to Bart. Get used to this back and forth stuff, by the way. The game will switch from the tournament to Bart swimming in sewage to save his cousin. You will want to know that however long you spend in Fei's matches determines how long you have to explore the sewer before another match starts. If you spend 5 minutes in a match, you will have 5 minutes to explore. If you get through all of the matches before you reach the castle (fortress?), there will be more guard troubles there. If you get there any time during the tournament, there will be less guard troubles. A wise strategy is to go take a break while Fei is in a fight, then finish the fight. Finish Bart's segment in one go then complete the tournament. If you want to fight Fei's next match, remember, you just have to wait for the timer to switch you over.
Bart needs to get in position first though! There are actually 2 locations you can finagle your way into the sewers at. One on the W, one on the E. You should take the W one so you can sweep up the items faster. Enter the sewer and prepare to begin the tournament! Here's the details for all of the fights, and remember, find something constructive to do for 10 minutes if you want to save time for Bart to explore. You can finish the tournament later. These guys aren't too tough yet, but you will meet a certain mysterious foe at the end... Don't be holding your Deathblows back in the name of leveling up other ones. Use your Deathblows, especially if you somehow find yourself in difficult times. Remember that if you have IRON VALOR and INNER HEALING you can stay alive, beating ass as long as you need to. Winning these fights is more about keeping your HP above critical. Just make sure you're using Omegasols in between battles if you have them, if not, use EP only to heal and use non-battle healing items like Hob-Jerky.
- GONZALES: This Goblin / Santa Clause combo is here to bounce up and down awkwardly as he decides whether to give you a present or a lump of something very displeasing. All jokes aside, when you're done waiting to give Bart time (if you're doing that), have no fear, just pummel this dude. No biggie. For proving your worthiness you will receive a SURVIVALTENT. Heal after battle (Omegasol anyone??).
- BIG JOE: You gotta love the Big Joe complex in this series. Every drama needs a showboat. Tell Joe where he can stick those sunglasses. This paragraph is pretty much just a placeholder. You know what to do. You'll get a METAL VEST for upstaging this lunatic.
- SCUD: A druggy, obviously. This young man relies on pills to accomplish his victories. According to the "Xenogears Perfect Works" compilation, this character's name was originally going to be "Sosa McGuire", but they thought "Scud" sounded cooler so they went with that. All you need to know for the fight is that if he lowers your attack, counter with IRON VALOR dummy! You will win a lock of the literal bible character SAMSON'S HAIR. That is absolutely amazing. It must be the only one currently in existence!
- DAN: Ah, the moment we've ALL been waiting for! Hold on just one second though, partner! If you beat that kid, you will forfeit the illustrious WEDDING DRESS armor (!) for your characters(!) That's more important than smashing that kid's nose bone into his brain. Keep your HP very high. Defend defend defend defend defend defend read. That's about it.
- WISEMAN: There's really not much to say. You just try and try and... well... eventually you will accept that they programmed this battle to be lame. The battle may suck, yes, but the dialogue should be interesting enough to anyone who's been waiting for some more of Fei's story to go on.

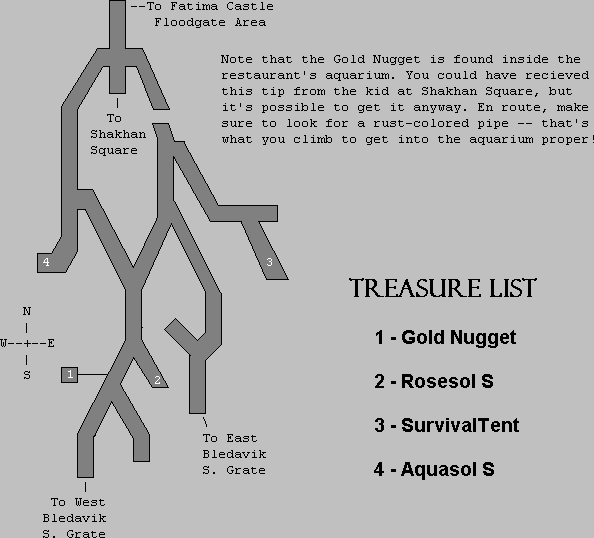
As for the sewer part, mash the ![]() button ridiculously to gain ground as you move upstream. Occasionally, the water flow will get too powerful to overcome. You may hide behind the sides of gates to rest though. From the W sewer entrance, swim up the channel until you see a pink pipe on the left wall. Climb it to an aquarium with a treasure chest inside. The chest holds a GOLD NUGGET, something we can ALL use much more of.
button ridiculously to gain ground as you move upstream. Occasionally, the water flow will get too powerful to overcome. You may hide behind the sides of gates to rest though. From the W sewer entrance, swim up the channel until you see a pink pipe on the left wall. Climb it to an aquarium with a treasure chest inside. The chest holds a GOLD NUGGET, something we can ALL use much more of.
Back in the sewer, swim up to the first branch-off after the pink pipe (not the one before). Go right down it to find a ROSESOL S, then make your way back and continue N. Take the E junction, then go straight N ignoring the branch-off you will pass. At the next junction go right, heading SE. After the trail turns E you will see a branch-off going S. Take it to find a SURVIVALTENT. Take my directions backwards now (W, S, SW, NW at every junction and branch-off from the tent). When you get to the NW part, go S at the next junction to find an AQUASOL S, then just go N and follow it until you find a place to climb out. I'm not exactly sure where the actual cutoff is for the guard patrols, so to be safe (if the tournament is still going) you should save your game then head up the ladder to the patrolled areas ASAP to be certain you'll get the lighter deployment. You may proceed to finish the tournament when you're in the palace. It's also not a big deal if you don't time this right, it's just classy if you do.
From where you enter the palace (smack dab in the middle of the quad, awesome job dude) go to the SE room. In there is a chest with a COBRA CRACKA whip for Bart. It inflicts poison! Yay! Let's get more treasure! While leaving rooms, you may peek in the hallway first. If you are avoiding combat for any reason, I suggest doing this every time you leave a room. The NE room has 4 suits of IRON ARMOR that you can jack from their displays. Equip one (1). The SW room will have some Hob meat hanging around. Grab the HOB-MEAT and the 2 HOB-JERKYs. Feel free to explore if you want, but the next destination is up! Exit directly S!
Go directly up the stairs and through the N door!
We're back! But we're up! The W/NW and E/NE doors along the wall up here go to longer, connected rooms, and each have an item inside. Don't confuse these directions to be leading you to the doors at the end of the balcony paths on the NW and NE sides. Those are the exits we're going to take in a bit. The W side room has a ROSESOL S and the E side room has a AQUASOL S. You should probably enter the E side room from the NE door though. There tends to be a ton of guards in here and all I know is I went through the direct E door and was right in front of them, while the NE door appeared to be out of their range. I was forced to fight all of them... naked. Anyway, when you've got all of the plunder, let's move on. Go through one of the doors at the end of the balcony path.
As I said earlier, you are free to explore. Actually, just apply that freedom to every part of this game. The areas in Xenogears have LOTS of extra parts added on that don't do squat for objective completion, so it's OK to run around. One warning though, you will get lost if you don't pay meticulous attention to where you came from when you started exploring :O
Upstairs is where we want to go. Run up 2 floors and look in the NE corner of the room for a door with 1 guard posted in front of it. Get through that door! In the resulting hallway, head N to find Cousin Margie's room! There is a save plate in there, so I'm telling you to use it. Prepare for war btw. Boss war. Speak to Cousin Margie when you're ready. Leave the room. Before you get to the end of this hallway make sure you have the Cobra Cracka equipped for its poison effect.
BOSS: RAMSUS AND MIANG[]
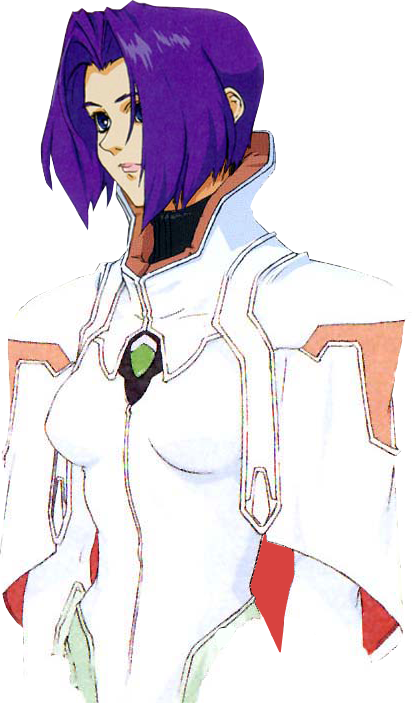

Militarian Floozy or perhaps.....?
|RAMSUS|
DIFFICULTY: MEDIUM
HP: 400
|MIANG|
Ok, so Miang's technically not a Boss. Now's a good time to try out comboing if you like! Miang and Cousin Margie will heal either side (sometimes). If you have the Cracka equipped, you will poison Ramsus most of the time, meaning Miang will remove the poison before bothering to heal him, and sometimes he even eats poison damage. Also, don't attack (I mean it) if he's in his Mirror Stance. It's the typical RPG body language for "I'm gonna smack you hard if you come anywhere near me". Wait for him to disengage the stance by defending. If you're comboing, only use one ![]() attack (if he's not in Mirror Stance of course) then wait for the turn to end. That will build AP in your reserves. When you have enough AP, press right to find the combo option and let 'er rip. This should effectively bypass any healing Miang may have been thinking about doing. If Bart hits critical HP, use items. Remember, WILD SMILE won't work here as it will be removed shortly. What's this?!
attack (if he's not in Mirror Stance of course) then wait for the turn to end. That will build AP in your reserves. When you have enough AP, press right to find the combo option and let 'er rip. This should effectively bypass any healing Miang may have been thinking about doing. If Bart hits critical HP, use items. Remember, WILD SMILE won't work here as it will be removed shortly. What's this?!
BOSS: RAMSUS AND MIANG ROUND 2[]
|RAMSUS|
DIFFICULTY: STILL MEDIUM
HP: 800
|MIANG|
Notice that Ramsus has twice as much HP this time. Now that you know the mechanics of this fight, you can repeat the strategy from above. Combo, don't combo, just be aware that poison and other status effects will not work a damn and it's all down to whether you can out-beat Miang's heals. She heals 100 HP every time now. You can still buff Fei with IRON VALOR at least. It's probably wise to full combo Ramsus' face pronto. Watch your HP.