| This is being preserved here as the past work of a specific editor, writer, or translator. Due to this, it may contain spoilers and/or be edited differently than the rest of the wiki. |
MOMO's Subconcious Domain (Do Realians Dream Of Electric Sheep?)
Section Briefing[]
After all of that epicness, we now will attempt to dive into MOMO's Subconcious Domain. In layman's terms, we gonna get inside 'dat head. Prepare to travel through a long dungeon, twice, essentially. It's all good though. I'll keep you warm and safe. Until we reach the Boss, that is. The Boss is... well... it's someone you should remember quite well. NOBODY can protect you from him. But I sure as hell will try guys. I really will. Without any further ado, I present to you, MOMO'S MIND!!! --BlackAlbedo 19:00, November 29, 2011 (UTC)
Before Diving[]
You could have done this with chaos before going to the U.M.N., but I prefer to do it now. Visit the Uzuki Residence once again and blow up the bamboo wall outside to find SEGMENT ADDRESS NO. 9. We can't decode it. Ah well. Shit. Better go destroy Jin's plants. Do so to obtain a BIO SPHERE. I bet Jin will be PISSED. HAHAHAHA. Here's the next GS Path Missions we can do:
This is optional, but you can scout for some items before heading into this next dungeon, which I recommend. It never hurts, ya' know?
At Area 40 Publishing in the stock room you can find SEGMENT ADDRESS NO. 3 and among the boxes a BOOST MAX.
On The Durandal in the Park there is a 100-Series Realian that has DECODER 11 if you didn't pick it up during GS 02.
On the Foundation blow up the cars to find SKILL UPGRADE A X5 and a BIO SPHERE. Blow up the pickup truck down the road for a MED KIT S. In King's East 6 Warehouse, blow up the boxes to find an ETHER PACK M and a MED KIT M.
When you're done with GS Missions, item scavenging, and anything else you could be doing besides saving MOMO, then lets go save MOMO. Head to the U.M.N. Control Center and speak with Allen twice to initiate the dive.
Subconcious Domain: Summer[]
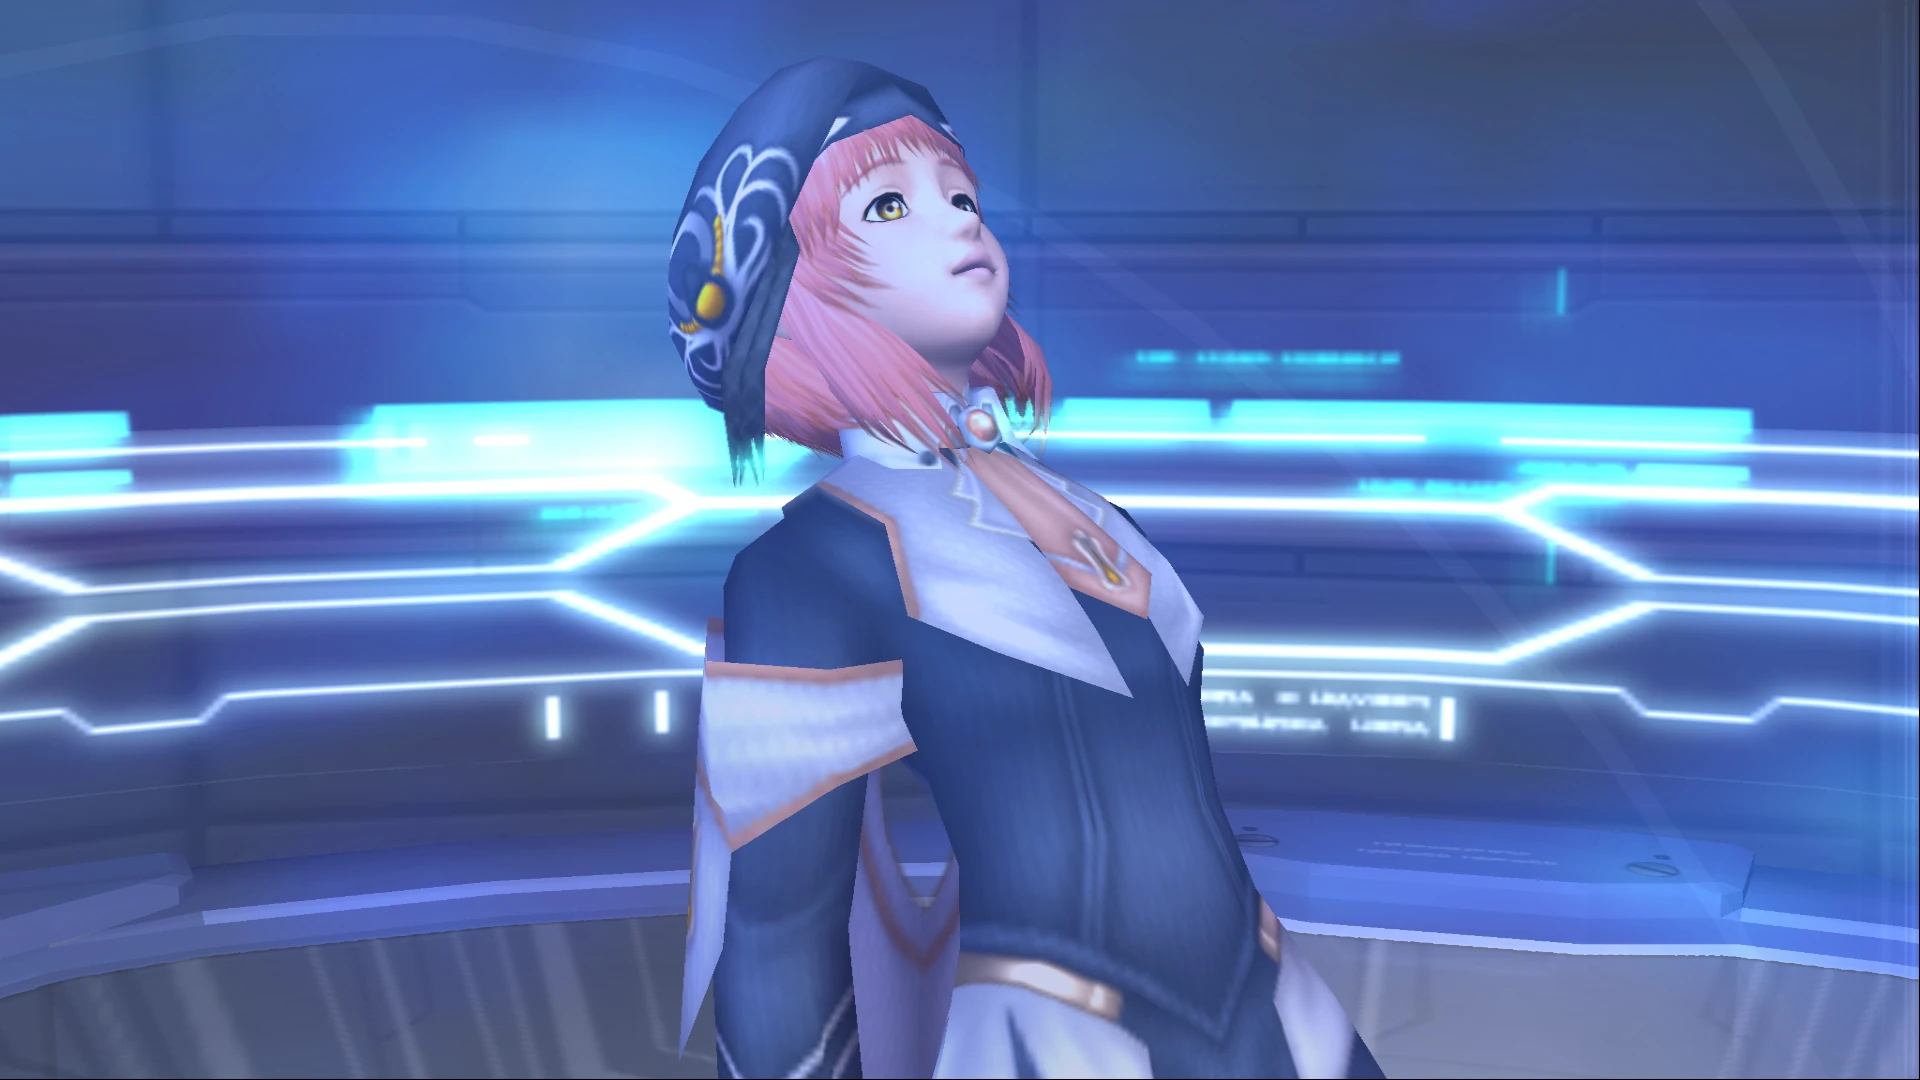
Poor, vulnerable MOMO.
After all of that crazy spinning around we'll be inside of MOMO/Sakura Mizrahi's brain. Enter the house. Before heading upstairs, hit the curtains to enter the kitchen, then hit the curtains here to find SKILL UPGRADE C X2. Now go upstairs. Enter the room for a cutscene.
After the cutscene, follow the specters out of the house and into the glowing circle to receive......... another cutscene!

Sakura, MOMO's sister, sharing a moment with Rubedo.
There are no items to be found at the Yuriev Institute. Just follow the specters. If you really want to dive into the story, you may explore and talk to the NPC's to gather information on the U.R.T.V.'s and related subjects, but if you just want to move on through the main story, just follow Rubedo and Co.
When the Yuriev Institute scenes are over, blow up the boxes at the gas station to find REVIVE S X2. Save your game, this place is tough if you aren't familiar with Episode II strategy. Whether you are or aren't, here's my best advice for this area.
Make a party of MOMO (who is actually worthwhile in this game), KOS-MOS, and Ziggy. You will find MOMO's attacks most useful when KOS-MOS and Ziggy have inflicted BREAK and possibly DOWN or AIR on an enemy. The foes here are pretty strong, and will seem overwhelming at first. The only advice I have besides that wise party setup is stay near the Save Point at first if you are unsure about fighting in this area. This will allow you to train on the Gnosis around here and return to the Save Point to heal up, then practice some more while gaining level ups and Skill Points. Practice until you have learned the Breaks of all of the local Gnosis and feel comfortable defeating them in battle, then move on. Don't forget to stock a few times so that you can unleash hell when you get the chance. Also, all the way north is a truck which has a destroyable object with a chest. Inside the chest is MED KIT M X2. OK, moving on...
Head right 2 screens. The first rock has nothing, the second rock has Gnosis. Btw, when fighting Vacillations, you need 2 characters to complete their Break. KOS-MOS or MOMO can hit the A zone with a ![]() attack, then a Boosted KOS-MOS or Ziggy can finish with a BB attack and whatever else they have stocked up. North in the alcove here attack the shack multiple times to blow it to smithereens and reveal a FORBIDDEN DEVICE. This will come into play much later. Continue east.
attack, then a Boosted KOS-MOS or Ziggy can finish with a BB attack and whatever else they have stocked up. North in the alcove here attack the shack multiple times to blow it to smithereens and reveal a FORBIDDEN DEVICE. This will come into play much later. Continue east.
In the next area head east up the slope. Head directly west at the top of the slope and destroy the rock to find a chest with SKILL UPGRADE B X4. Now head east down the fallen log. Go north up the first path (ignoring the easternmost path) and west to find a tree which you can hit to make a bridge. Make the bridge, and cross, following the path beyond.
Blowing up the rock leads to a dead-end (this area, among many here, are used in a future GS Mission, but are of no worth to us now). You may knock down a tree all the way east to make another bridge, but it doesn't help us much right now. Just go north along the open path into the next zone.
Go east here until you reach the clearing. Take the first western path to find a tree you can knock down and a rock you can obliterate. OK look. If you knock down the tree, you can't destroy any more rocks unless you leave the area and reset the events. What you want to do is destroy the first rock here, then take the next path up to the river and destroy the second rock, THEN knock down the tree. It will make a bridge to an area that has a chest with DECODER 04. Leave the area the way you came in, then re-enter and DON'T destroy any rocks before knocking the tree down to make a bridge. The other place you can make a bridge to here doesn't have anything for us right now.
Across the way, save your game and head east. Take the first west junction to find a chest with ANTIDOTE H X2. Going back, take the next west junction and ignore the small meadow to the north to find the exit to this zone.
In this zone, you may destroy the rock on the first west path to find a Gnosis. If you go east into the lower path and exit south, you can blow up a rock here to find a BOOST MAX. If you stay on the lower path and head west, you will find a wall you can destroy to create a shortcut to the beginning of this area. Create the shortcut, then return to the upper path and attempt to cross the logs to the other side. Once on the other side, blow up the tree to the right and enter the hidden path. Drop down and open the chest to find a BOOST MAX. Return across the logs and head north instead. Before leaving the area though, swich MOMO out of the party for chaos. His moves will do a lot more damage in this stretch.
The Infected U.R.T.V.'s are pretty simple with chaos in the party. Save your game after the first battle. This stretch of land is the last place you can prepare before fighting the next Boss. Do all of the leveling you want to before heading into the next zone. Definitely save your game before you move on, in any case. Your party, when you move on, should consist of MOMO, chaos, and KOS-MOS (ditch Ziggy). The Level 2 Class B Skill AURA SWORD will help a lot in this Boss fight. Now is a good time to use Class or Skill Upgrade items if you don't have AURA SWORD. Proceed northward for the Boss fight.
BOSS: LEVEL 4[]
DIFFICULTY: EASY
HP: 5760
WEAKNESS: PHYSICAL / AURA / THUNDER / PIERCE / SLASH
BREAK: CCBB
ITEM: ETHER PACK DX
RARE ITEM: SKILL UPGRADE E
Soooooo... Move KOS-MOS behind the enemy ASAP and stock to full with everyone. We're gonna unload on this freak right away. As soon as your stock is full, cast AURA SWORD on KOS-MOS and MOMO. When it's KOS-MOS' turn, Boost chaos, perform a CC zone attack, then have chaos do a BB zone attack while finishing with ![]()
![]()
![]() to down the bitch and do some damage. Be sure to have MOMO ready on Boost before you finish chaos' turn so that she can unload on this weirdo, and have KOS-MOS ready after MOMO (with AURA SWORD still active hopefully) to possibly finish the battle. The Boss has the capability to summon Infected U.R.T.V.'s with which to absorb their HP. You shouldn't waste time attacking them unless you can kill them in one hit for sure. Otherwise, just focus on eliminating the Boss on the Point Multiplier, like usual. If you follow the strategy here, you can use and abuse this fool.
to down the bitch and do some damage. Be sure to have MOMO ready on Boost before you finish chaos' turn so that she can unload on this weirdo, and have KOS-MOS ready after MOMO (with AURA SWORD still active hopefully) to possibly finish the battle. The Boss has the capability to summon Infected U.R.T.V.'s with which to absorb their HP. You shouldn't waste time attacking them unless you can kill them in one hit for sure. Otherwise, just focus on eliminating the Boss on the Point Multiplier, like usual. If you follow the strategy here, you can use and abuse this fool.
Now we're back at the Yuriev Institute. Follow the ghosts. I know it's been forever since I've posted an external link that tickled your funny bone, but I just can't think of one right now. Just... follow the ghosts for cutscenes galore.
This game's cutscenes are definitely the best so far. Albedo's story is completely understandable after learning about his background. I tried, but I can't even joke about it. I know it's all a little funny. Most Anime is. But when I think about how this story applies to real life, it just makes sense why Albedo is the way he is, why Rubedo is the way HE is, and why I should just shut up and write the rest of this wakthrough.
Subconcious Domain: Winter[]


Sexy Shion breaking up the monotony of the Subconcious Domain~~<3<3<3
We will now be in the Winter version of the exact same dungeon, MOMO's Subconcious Domain. Shit. We have to go through everything again. Use MOMO, Ziggy, and KP-X, just like before. Be warned, the enemies are tougher this time around. This party will still suffice in overcoming, though. The level design is mostly the same too. Items have restocked as well. Here, I'll walk you through it (as if this were some sort of "walkthrough" haha).
The "Creation Type" Gnosis here (Break BB) will self-destruct when it is on its last couple hundred HP btw, causing massive damage to everyone. Break the box just left of the Save Point to find a MED KIT S. Continue north and go behind the billboard to destroy an object hiding a chest. Inside the chest is an ANTIDOTE L X2. Head along the east path from the Save Point. Cross the empty zone into the next zone.
In this zone, blow up the rock to find an ETHER PACK S X2. Exit through the east path into the next zone.
In here, you can blow up the west rock to find a Gnosis. Otherwise, just go down the log to the right and go up the first path. Knock down the tree when you find it and cross to the other side. Fight past the Gnosis, then blow up the rock and head into the north alcove to find a chest with BIO SPHERE X2 inside. Continue east into the next zone.
In this zone if you want the good items, blow up the first 3 rocks from left to right in the stream, then knock down the log. Cross it to find a rock which you should explode to find SKILL UPGRADE B X4. Leave and return, then blow up only the first 2 rocks in the stream before knocking the log down. Blow up the box here for a BIO SPHERE. Leave the area once more and return, this time, blowing up NO rocks and knocking the tree down to cross for good. Save your game, I COMMAND YOU!
Just above the Save Point around the bend is a chest with a REJUVENATOR M. There is a rock you can destroyablode by a tree near the way out, but it just has another Gnosis. Follow the path north into the next area. We're almost at the end! Hang in there! Or don't. I don't care.
Follow the path to the clearing. Use that trap wisely it'll help tons. The short path up the west slope has a rock you can destroyablode for an ETHER PACK M. Head down the east path into the empty riverbed and go south out of the zone. Blow up the rock to get a REVIVE S. Return to the last area!!
At the end of the dried-up riverbed you may destroy the wall here to make a shortcut back to the beginning. Do this, as it will be important later. GASP! SEE THAT SEGMENT ADDRESS ON THE LEDGE??? Lets get it! Climb back up to the clearing and cross the log to get to the other side. Blow up the harmless tree standing in our way and follow the hidden path east. Drop down to the ledge when given a chance to find SEGMENT ADDRESS NO. 15!!! Aw shit, we can't open it yet. Sorry to get you all excited. I, uhhh.... I... Lets move on. Jump down, circle around, cross the log and exit north into the next zone.
OK! NOW we're almost done here! Make good use of this Save Point here, it's the last one before the Boss. After defeating all of the enemies in this area, use it to save/recharge if you need to. Head north up the middle and cross to the other side. Go up then head west and cross again. Go north to the junction and head west. On the north-west and south-west sides here you can find items, each protected by Gnosis. North-west has SKILL UPGRADE A X10 hidden in the rock. South-west has a rock you will blow up to find a chest with ETHER PACK M X2. Before you cross the final log and go north toward the Boss, head east and blow up the rock to find a chest with SKILL UPGRADE C X2.
Before you head to the Boss, make these preparations. Make a party of Jr., Ziggy, and MOMO. Unlock the FIRE SWORD Ether with as many of them as you can (1 is fine, 2 is plenty). Don't enter this battle without PSYCHO POCKET on at least one character, either. There is a SUPER RARE item on this Boss that's on only a few Bosses in the game that will teach you new Double Attacks. Use some of those SKILL UPGRADES if you got 'em so you can get these Ethers. If you need HP/EP return to the Save Point at the entrance of this area and save. Actually, do that anyway, it's a great idea. That's it. That should be all you need. Make sure you have the Skills you want equipped on your party members, then cross that sexy log bridge up north you sexy beast!
BOSS: ALBEDO[]
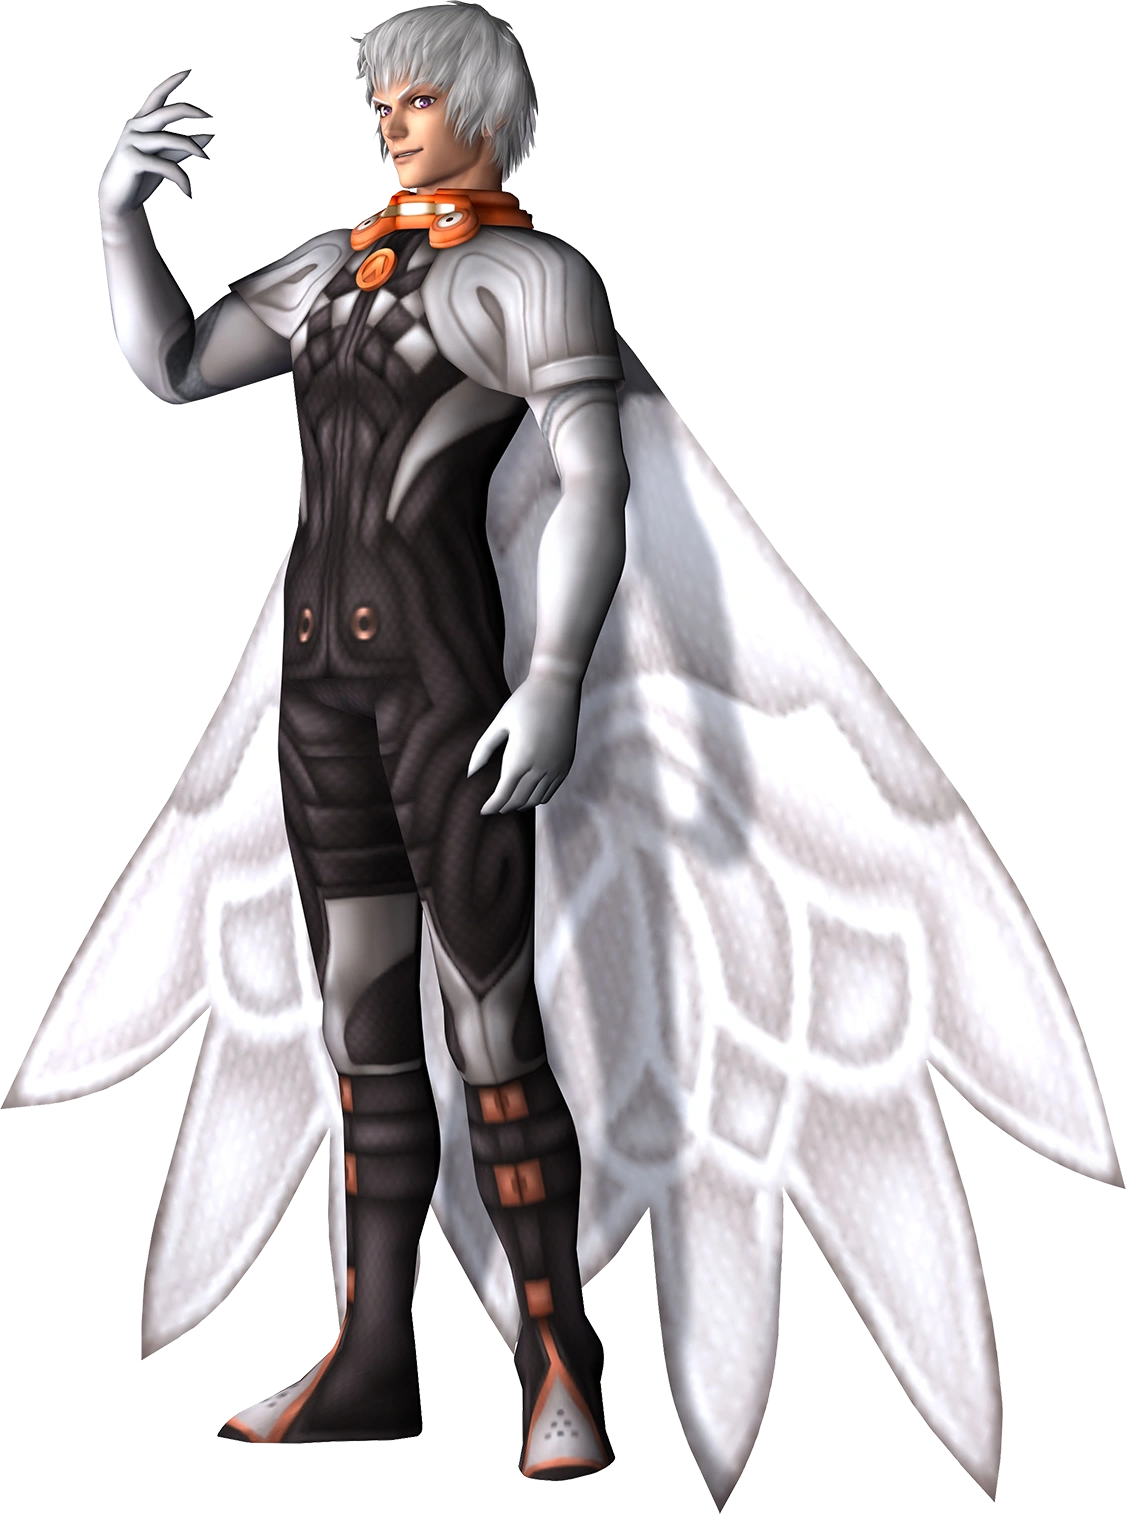
DIFFICULTY: MEDIUM
HP: 7680
WEAKNESS: FIRE / PIERCE / SLASH
BREAK: BCCB
ITEM: SKILL UPGRADE E
RARE ITEM: AWAKENING I
We meet again, Albedo!! Prepare to eat shit! The only thing that makes this fight medium difficulty is the timing of it all. Here's what you do. First thing before doing ANY fighting is to use PSYCHO POCKET to get AWAKENING I. When you have that, stock to full with everyone. When you are fully stocked, do ![]() /
/ ![]() attacks repeatedly to weaken his arms which are currently shielding him from large damage. If you think you are close to destroying his arms, cast FIRE SWORD on Jr. and MOMO. You can also cast it right after the arms are destroyed in time to launch an assault, it just helps to be one step ahead because it sucks if he regenerates his arms before you can unleash fury on him. Also get ATTACKER on Jr. if you really want to finish Albedo in one assault. So when his arms are down and you have FIRE SWORD up, start the attack with Jr., having Ziggy Boosted right after him. Hit BC with Jr., then have Ziggy hit CB followed by his full stock of
attacks repeatedly to weaken his arms which are currently shielding him from large damage. If you think you are close to destroying his arms, cast FIRE SWORD on Jr. and MOMO. You can also cast it right after the arms are destroyed in time to launch an assault, it just helps to be one step ahead because it sucks if he regenerates his arms before you can unleash fury on him. Also get ATTACKER on Jr. if you really want to finish Albedo in one assault. So when his arms are down and you have FIRE SWORD up, start the attack with Jr., having Ziggy Boosted right after him. Hit BC with Jr., then have Ziggy hit CB followed by his full stock of ![]() attacks making sure to Boost Jr. and MOMO before Albedo can get back up. Let out their full stock of
attacks making sure to Boost Jr. and MOMO before Albedo can get back up. Let out their full stock of ![]() attacks with FIRE SWORD up while Albedo is taking a dirt nap from Ziggy's last attack. This should bring the battle near to a close, if not close it altogether. You shouldn't have to stock up another major assault, in any case. Keep healing as he's usually pretty pissed when he gets back up if you didn't kill him. If he isn't dead yet, he will drain your Boost a lot and restore HP. This is tough if you land here, but stock up MOMO to full and unload on him at your first opportunity, and he should submit. Multiply those Points ;)
attacks with FIRE SWORD up while Albedo is taking a dirt nap from Ziggy's last attack. This should bring the battle near to a close, if not close it altogether. You shouldn't have to stock up another major assault, in any case. Keep healing as he's usually pretty pissed when he gets back up if you didn't kill him. If he isn't dead yet, he will drain your Boost a lot and restore HP. This is tough if you land here, but stock up MOMO to full and unload on him at your first opportunity, and he should submit. Multiply those Points ;)
If you survive this battle, prepare for some sweet cutscenes with LOTS of yelling. Personally, I wish they had just shown us a lot of the details during the race to get to Old Miltia instead of having Shion narrate in the third person a brief portion of it. Either way, the race is on! You're welcome for the double-links, I know it's been a while since I gave you something to watch :P. I'll see you on the flip side you lucky people!