| This is being preserved here as the past work of a specific editor, writer, or translator. Due to this, it may contain spoilers and/or be edited differently than the rest of the wiki. |
Messing With Ormus (Do You Guys Just Have Some Pamphlets Or Something?)
Section Briefing[]
We will now storm the Ormus Stronghold, a giant space-flower filled with religious kooks that have an aggressive message: Die. In case you were wondering, Ormus is directly affiliated with U-TIC and the Immigrant Fleet. They might as well all be the same thing. The reason for the misleading names is because they wanted less attention and kind of had to lay low. Hey, I finally managed to put some actual game facts in my Briefing. Good for me. I know we all want to celebrate, but it's time for us to mess with Ormus. They got in our way to stop us, they were asking for it. Now we're going to tear them apart from the inside out. THAT'LL teach 'em. Lets do some damage! --BlackAlbedo 03:42, December 2, 2011 (UTC)
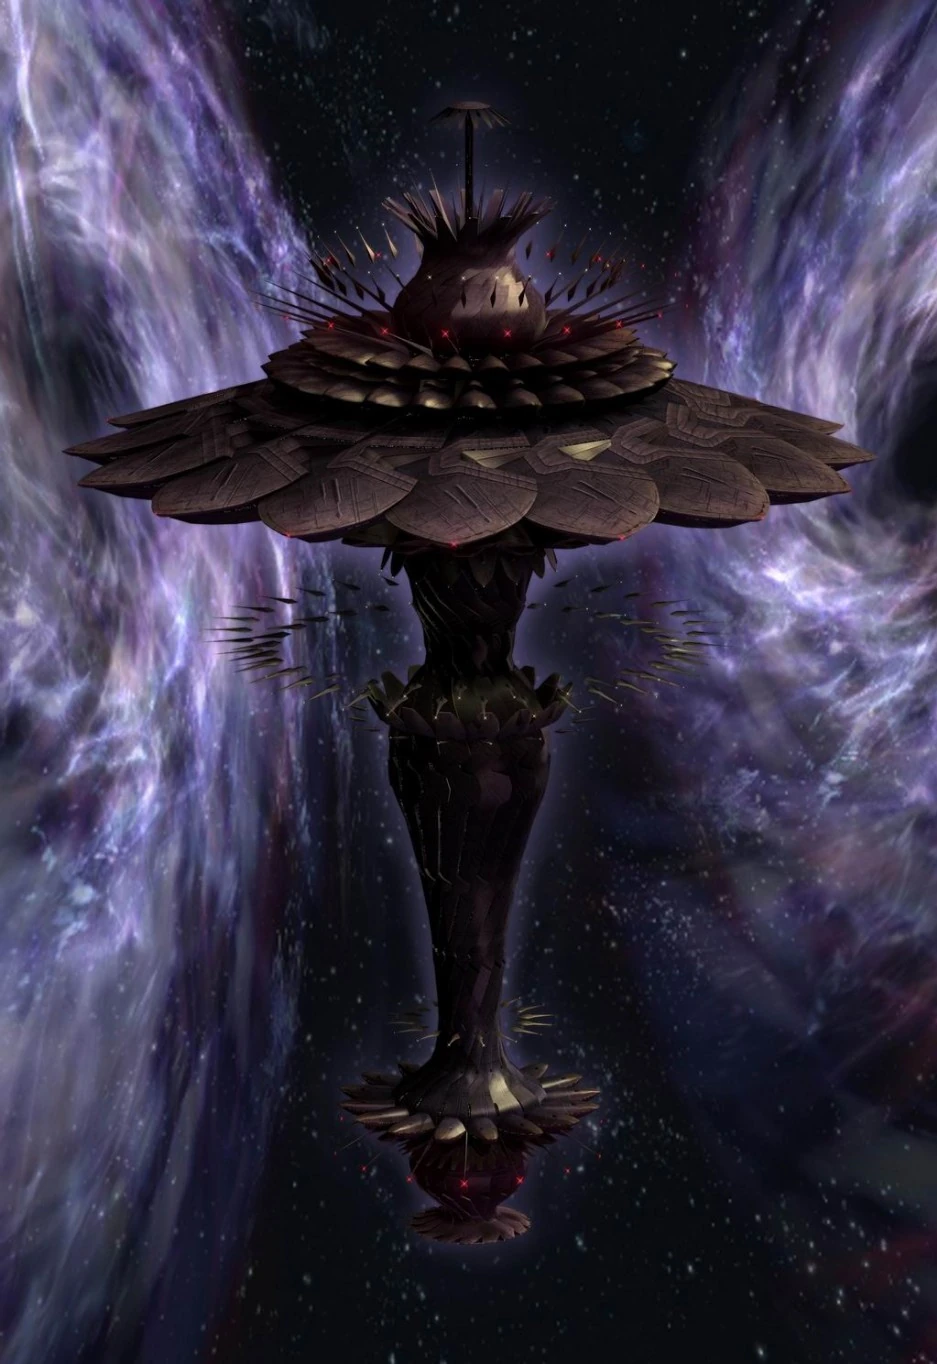
Ormus Stronghold[]
This area is sweet. Awesome space backgrounds (2 Black Holes!) and some of the most quest-worthy music I've heard all game. Sweet. Go south from The Elsa along the path. Remember, in E.S. combat it's simply kill or be killed. There are no points to multiply. Boost is the only real thing you should focus on. That and who's riding what E.S. craft so you have the skills you need, but that's not too important right at this moment. At the next Boss it will be. But not right now.
Flower Of The Abyss
Take the first east branch-off to find a targetable structure. Hit it to send it hurtling into space. Take THAT, Ormus! Underneath it is a yellow device which, besides its color, is identical to the red one we found in MOMO's Subconcious Domain: Summer. Interesting. We will use this later. For now, continue south on the path, then go north-west at the junction.
You will see 4 areas with 2 posts to target and hit here. Hit the posts to spin the lock domes until the hole in the dome is facing the lock rod directly below. Do this with all 4, then the floor just ahead will open up and reveal an elevator. Take it down and head west into the fortress. In here, approach the platform to disembark the E.S. for now, and go west into the next room. In here, just press the red button to make another elevator appear, which we will utilize later. Return to your E.S. craft, go back up top, take the south-west junction back on the narrow path, and blow up the wall to reach the next area.
In here, knock down the sections of wall to get around the square platforms. There are 4 square platforms, one in each corner. Go to the north-east one and get onto the east path attached to it to find a chest with a CHARGE RECOVER. Go to the south-west one and get onto the south path attached to it to find a G SLOW GUARD. The exit is on the far west side.
In the next room, blow up the objects for lots of items: Some NANO REPAIR A X2, NANO SPHERE X2, NANO REPAIR Z X2, and NANO REPAIR A X4. OK, we need to change some party arrangements before going to the Boss here. Take Shion out of E.S. Dinah and put her in E.S. Asher with Jr. As for chaos, he belongs in Dinah with KOS-MOS. Go ahead and put Jin in the E.S. Zebulun with MOMO and put Ziggy in the reserves. Now arrange your E.S. craft so that Dinah and Zebulun are in the fighting party and Asher is in reserve. Zebulun is the only E.S. that can cast Ether, so remember that if you need to heal. It would be wise to give MOMO more healing Ethers if you can afford to do so. When you are ready, ride the elevator up. Be sure to blow up the boxes as you pass them, we will need them out of the way to progress further later.
BOSS: PILUM AND SCUTUM[]
DIFFICULTY: EASY
Dumb
|PILUM|
HP: 17,700
WEAKNESS: PHYSICAL / PIERCE / STRIKE
BREAK: NONE
ITEM: ANTI-THUNDER ARMOR
RARE ITEM: TUNED CIRCUIT
Dumber
|SCUTUM|
HP: 19,200
WEAKNESS: ETHER / BEAM / AURA / THUNDER
BREAK: NONE
ITEM: ANTI-FIRE ARMOR
RARE ITEM: CHARGE BOOST
Right off, stock up to 200 with both E.S. craft. With 200 EC, use Zebulun's GOLDEN BOW and Dinah's CHAINED BLAST on Scutum a couple of times until he is defeated. Have Zebulun heal as needed. Pilum has a dangerous attack that can take off 10,000 HP +/- so be wary of that. He shouldn't use it too often, so you should be safe ultimately. It is hard reviving someone who died to full HP in Boss battles with only 2 party members, so keep those HP's up. After Scutum has been defeated and Dinah is healed sufficiently, switch Zeb out for Asher. Stock to 200 with each E.S. and use CHAINED BLAST and GATLING BLAST to defeat Pilum. You should be able to get through this battle with just a few scratches. It IS your first E.S. Boss battle, anyway. They're not going to go TOO hard on us. It's just a matter of knowing that paper beats rock, rock beats scissors, scissors beats paper. Use the moves I taught you, you'll win ;) Use Boost liberally.
After this awkward fight, press the blue button at the north end of the room to make a bridge. Return south and go down the elevator (seriously, blow up the boxes if you missed them the first time). Go ALLLL the way back to where we released the 4 locks on the surface of the Ormus Stronghold. Go down and disembark your E.S. craft. We can now proceed further on foot because we destroyed those boxes (right?). Open the chest to find SECRET KEY 14, which opens the Level 3 Class C Skill RAPID REFRESH. My feelings on this. Continue west.
In the next area, I advise a party of Jin, chaos, and Ziggy. Climb the ladder and follow the path defeating the enemies along the way. You will pass by a destroyable wall when you are heading east. Hit it multiple times to find CLASS UPGRADE B X6, and behind that, a chest with DECODER 02. Sweet! Before you climb the second ladder, head south and knock down the wall to create a shortcut down to where we started and find CLASS UPGRADE C X6. Climb the ladder and enter the door into the next zone.
Here, follow the path around for a bit. When you find the floating P.S.S. - A enemy, put Shion in the party. She's really the ONLY one who can damage these things (decently). Fully stock her and unleash all but one of her stock. That should be enough, and you only need to stock once more to take down the other one. MOMO hits them alright, but does little damage. Shion is really the only way to go with these guys.
In the next area, you will see a bunch of blocks stacked up on an elevator. This is a very weird puzzle, as the solution is pretty stupid. Hit the stack from the right side when the bottom blocks are green (moving the green blocks onto the elevator) and when the blocks are blue, hit them from the south side to destroy them. Not really a puzzle, huh? Climb down the ladder, board the platform, and destroy one block to reach the door that exits this area. YOU WIN!!!
Now for a sliding block puzzle. This would be pretty tough without directions, eh?? Follow along closely, young ones:
- Move the northernmost box north.
- Move the box immediately to your right north, then west.
- Move the box to the right of that north and then west also.
- Move the box directly south of the first box we moved north.
- Move the box by the drop-off north into the gap.
- Move the box just left of the gap east, then north into the gap.
- Move the box that was just south of that one north, then east, then north into the gap.
- Move the last two boxes north, east, and north into the gap to finish the bridge. YOU WIN!!!
On the other side, you will see 5 green boxes. Number them 1-5 from left to right. Hit number 4 south until it drops. Move number 5 so it drops just south of the first box. Now move 3, then 2, then 1 so that they drop off of the east side of the second box to drop. Be especially careful to NOT slide them onto the blue bridge. You can't move them east if they so much as touch block 1 of the blue bridge. This will make a bridge to SEGMENT ADDRESS NO. 13. Check it out. The bridge will be made forever. Now exit out of the north-east door.
Alright. I've demanded your attention for a few puzzles in this game, and the last one, but for THIS puzzle, you really need to follow my directions. I will try to make them easy to digest. Just so you know, Orange transporters move you down, blue ones move you up, and you can run around the ones you don't want to take. OK, lets go!
We're gonna find Segment Address No. 4 first!
- Take the only orange transporter.
- Take the blue transporter at the far east side.
- Take the orange transporter on the far end of this platform. Run east to find SEGMENT ADDRESS NO. 4. I say we decode it! Go with me to find a chest with SECRET KEY 9 inside. Now you can buy the Level 2 Class H Skill EXPANSION PACK! JOY! To return to the starting point, follow these directions:
- Take the middle blue transporter up.
- Go up the next blue transporter.
- Take the only orange transporter on the far left side.
- Take the only blue transporter you CAN take on the far left side to reach the beginning platform.
Now we will head to the next area.
- Take the south orange transporter.
- Take the easternmost blue transporter.
- Take the middle orange transporter.
- Take the only other transporter here.
- Take the only other orange transporter on this level.
- Take the only other orange transporter on this level.
- Take the only other transporter on this level.
- Take the only orange transporter on this level.
I hope nobody got lost. This place is a bitch. After going down that orange transporter, head right, then take the path into the center of the circle to ride the green transporter down to the next zone.
Before you save your game, make the following preparations. We have a Boss coming up which involves an intricate strategy. I hate this fight. Put Shion, KOS-MOS, and Jin in your main party. Use Skill Points you may have (make sure you have enough healing Ethers to go around) and save your damn game, damn it. Take the blue transporter to the east to reach the top level, then head to the center to reveal a hidden door into the Boss' lair. Good luck.
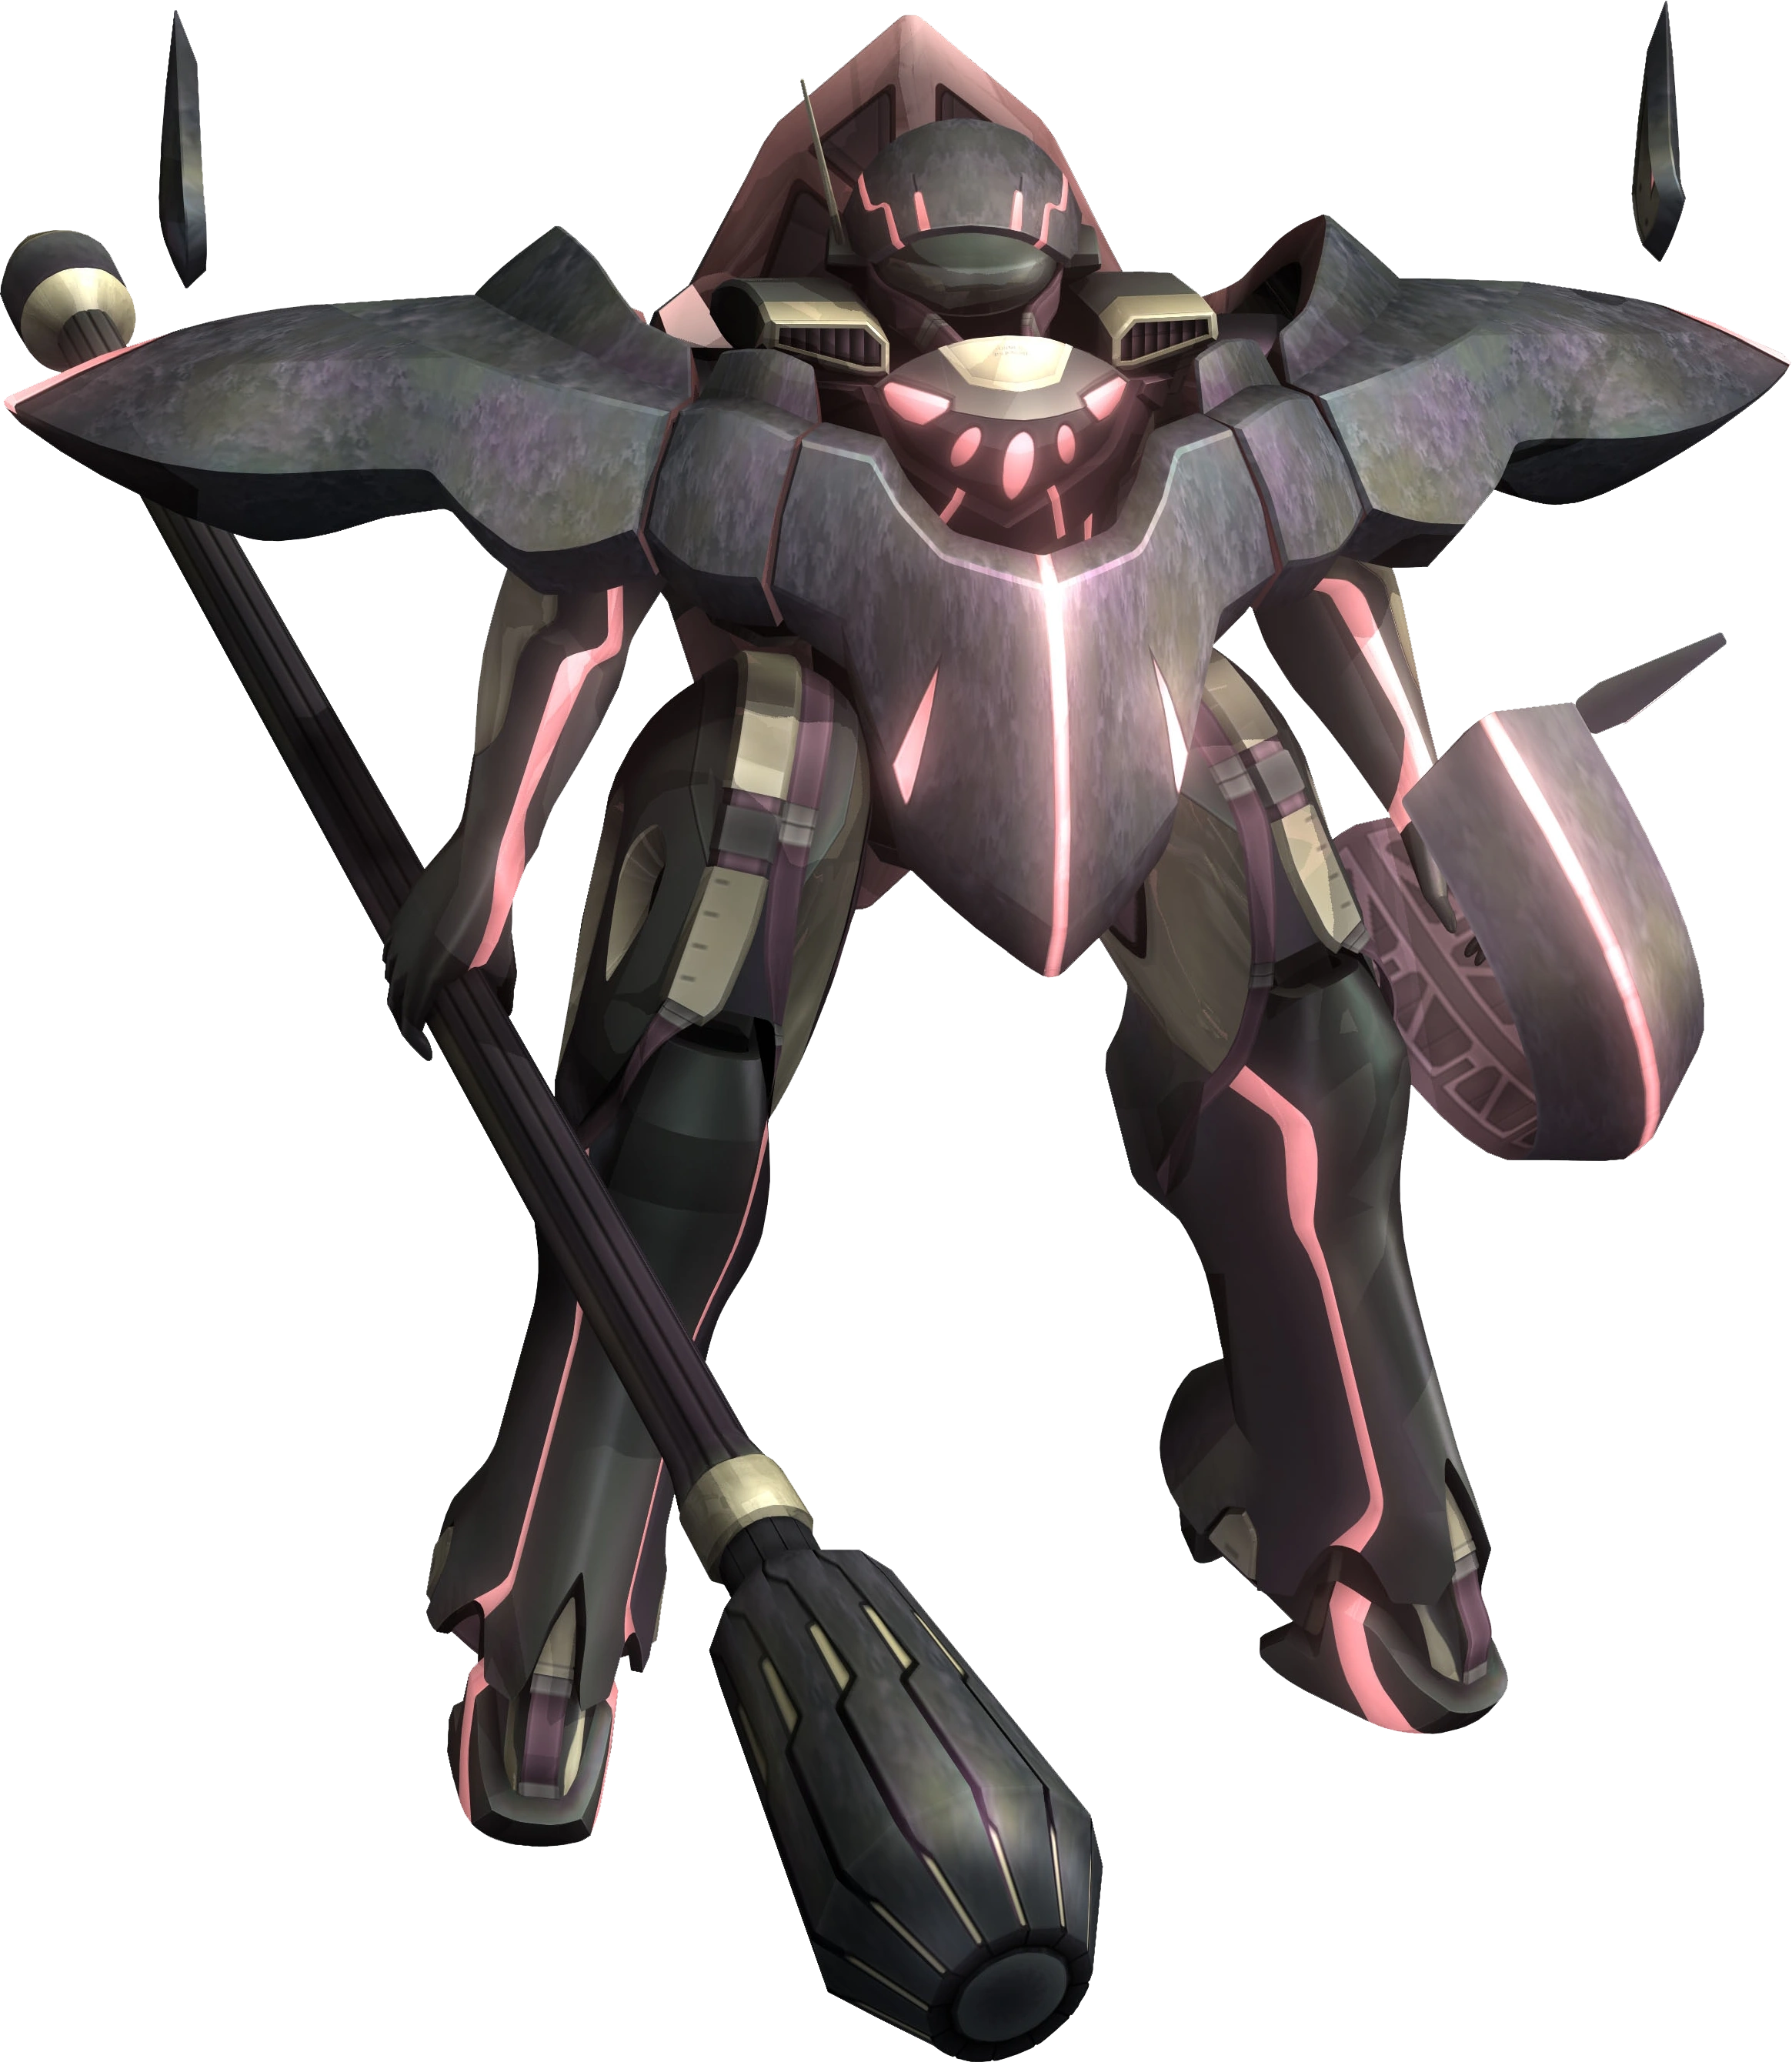
BOSS: ORGULLA[]
DIFFICULTY: MEDIUM


Santa Clause's goth teenage daughter doesn't want us to leave just yet...
|ORGULLA|
HP: 18,000
WEAKNESS: ETHER / THUNDER / STRIKE
BREAK: BCBB
ITEM: SKILL UPGRADE E
RARE ITEM: AWAKENING II
|MANES|
HP: 18,000
WEAKNESS: PHYSICAL / FIRE / PIERCE
BREAK: CBB
ITEM: SKILL UPGRADE E
RARE ITEM: NONE
Orgulla has another personality named Manes. It's one target with two personalities, sharing HP. First off, steal the AWAKENING II. Don't miss it. FYI, it's possible to steal more of these if Orgulla goes back from Manes to Orgulla. Just steal every time she's Orgulla again to get more AWAKENING II's. It's helpful to have more for GS 32, but you don't need to push yourself to get them here. One will serve our purposes. As for battle strategy, stock to full with everyone. If she steals all of your Boost right off the bat, just use normal ![]() attacks until you build it back up to between 2 and 3 again. Cast THUNDER SWORD on Jin and KOS-MOS, then use either of those two to AIR Orgulla. Unleash hell with all of your characters by using Boost while she's in the air. When Orgulla changes into Manes, switch out Shion and Jin for Ziggy and Jr. Stock to full, then use FLAME SWORD on Jr. and KOS-MOS, and start beating her ass with Ziggy to DOWN her, then Boost everyone else behind. If you REALLY want to kill her bad, also cast ATTACKER on Jr. and/or KOS-MOS if you have the time. This should do the trick, but if it doesn't for some reason, just remember to steal again if she reverts to Orgulla (it will save you lots of time on GS 32 if you get another AWAKENING II), and switch back to Shion, Jin, and KOS-MOS as needed. Same strategy, just match the personality. You can win with this strategy, I have faith in you! YEAH!
attacks until you build it back up to between 2 and 3 again. Cast THUNDER SWORD on Jin and KOS-MOS, then use either of those two to AIR Orgulla. Unleash hell with all of your characters by using Boost while she's in the air. When Orgulla changes into Manes, switch out Shion and Jin for Ziggy and Jr. Stock to full, then use FLAME SWORD on Jr. and KOS-MOS, and start beating her ass with Ziggy to DOWN her, then Boost everyone else behind. If you REALLY want to kill her bad, also cast ATTACKER on Jr. and/or KOS-MOS if you have the time. This should do the trick, but if it doesn't for some reason, just remember to steal again if she reverts to Orgulla (it will save you lots of time on GS 32 if you get another AWAKENING II), and switch back to Shion, Jin, and KOS-MOS as needed. Same strategy, just match the personality. You can win with this strategy, I have faith in you! YEAH!
After the battle, hit any one of the blue electric pillars to drop a central unit into the water below. Head south up the stairs, then west down the orange transporter. Save your game, then run north into the thing we dropped. In here is a strange fuse relay we need to adjust to destroy it. Here's what to do:
- Hit the mark on the farthest west side.
- Hit the one JUST south-east of that once.
- Head DIRECTLY east and hit that one once.
When you are ready, approach the center console and select "Press the ignition button." to light it up. We now have 30 minutes to get the fuck outta here! RUN, DAMMIT!!!
Ride the green transporter up. At the top, run north to the first blue transporter. Take the next blue transporter up. Fight the enemy to the west and go down the orange transporter. Take the westernmost blue transporter to reach the beginning. Run west out the door.
Run across the bridge south and go out the door in the south-east.
Use the elevator to go up, then run out the east door.
Run up the twisty path to the door. This place takes the longest to get through because of all of the inevitable enemies, but just keep fighting through. You should have less than 15 minutes remaining at the top of the twisty path.
Run across the bridge.
Run south down that shortcut slope we made earlier, go down the ladder, then through the door.
Run east across the area to the east door and exit. Board the E.S. crafts.
If you have trouble making it to this point with enough time remaining on the clock, you need to finish your battles quicker. That's where all the time gets sucked away. Make a few preparations as soon as you board your E.S. crafts. Put chaos in Zebulun and Jin in Asher, then put those two E.S. crafts into your battle party. Now continue east through the doors.
BOSS: E.S. ISSACHAR[]
DIFFICULTY: EASY
HP: 30, 400
WEAKNESS: AURA / ICE / PIERCE / SLASH
BREAK: NONE
ITEM: EMAX300
Ah, Pellegri. I ♥ jyoo. Ok, Ok, I'll tell you how best to beat my fantasy girlfriend. Stock to 200 with both E.S. craft then use the WINGS OF LIGHT and ICE RONDO special attacks to inflict large amounts of pain on E.S. Issachar. Always try to time at least one of your attacks on the Critical Hit Event Slot (again, no Skill Points to be gained in E.S. fights...). Repeating this strategy over and over again should see you emerge triumphant. Be sure to use Zeb's powers to heal if you need it. It's quite possible you will need to heal. In any case, YOU WIN!!! YEAH!!!